Showing posts with label Fermented Foods. Show all posts

Sunday, March 2, 2014

Some Cultured Spring Veggies


Time is just flying!  Life is full and busy, with school, children, cooking, and starting up my new business, you can see HERE.

Right now a lot of our "spring" produce is coming in, including strawberries (filled my dehydrator with about 20 or so pints the other day!), blueberries, and lots of yummy veggies.

I have made a lot of cultured veggies in the past week, and yesterday, I made this one with some radishes, and romanesco that came in our co-op the week.  I love the colors.  It was very easy to make, and probiotic rich.

I used a 3L pickl-it jar and had two small head of romanesco and about 12 large radishes.  I broke the romanesco into small pieces and cut the radishes in quarters since they were so large.  I used a brine with a ratio of 19g salt to 4 cups of water.  This will sit in our pantry for 4-5 or until it stops bubbling.  I can't wait to try these.  My 4 year old really likes "radish pickles."

Thanks for hanging in there with me, as life is so busy for me these days!


Friday, November 30, 2012

Whole Foods Friday - Mission Olives


It's whole foods Friday and I thought I would feature a brand new project I am in the process of tackling.  We love olives in our home, but don't get to eat them very much as the organic ones are quite expensive and I don't like the fact that many of them are cured with lye.

So, I decided to buy some organic mission olives from Chaffin Family Farms, and try my hand at salt curing these olives.

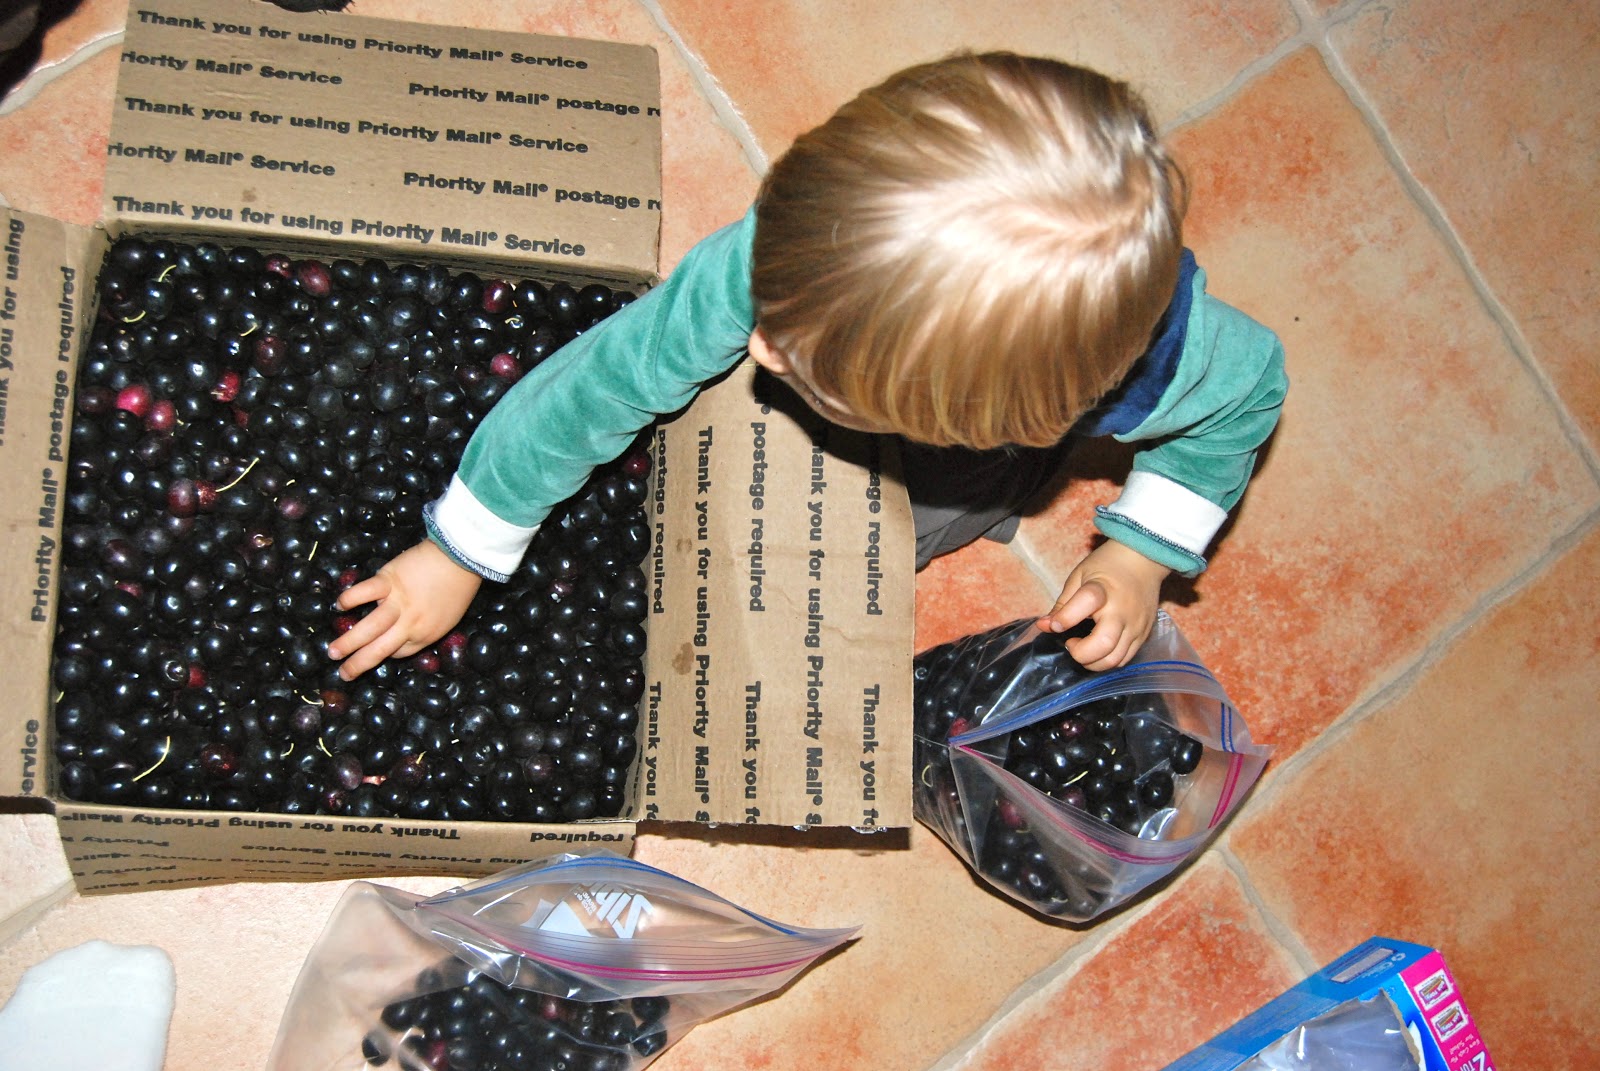
They arrived yesterday and me and my son packed them into some ziplock bags and put them in the fridge as my bulk order of salt will not arrive until early next week.  We will then pack them up with the salt into 5L glass fido jars and hope they cure!  I received 17 pounds of olives from Chaffin Family Farms and plan to use about 25-27 pounds of sea salt for the curing.  The process is pretty easy, and I read this post to get some guidance.

I will keep you all posted on how it goes.  Aren't they beautiful?!


Monday, September 3, 2012

Cultured Mondays - Curtido, the Pickl-it Way!

Happy Labor Day!  I hope everyone is enjoying the holiday weekend.  Today I am featuring a recipe by Melanie, at Pickle Me Too.  I have wanted to try this recipe for a long time and can't wait until I find the time to squeeze it into my busy schedule.

Curtido is a yummy mix of fermented cabbage, carrots, onions, hot peppers, and cumin seeds.  This kraut will ferment for 8-10 weeks, though some wait as long as 6 months to eat it.  What a delicious way to get your probiotics!

So, hop on over to Melanie's blog for the full recipe, and enjoy this South American style of sauerkraut!


Sunday, August 19, 2012

Cultured Mondays - Dilly Green Beans and Radishes

The summer produce is rolling in and I have a number of ferments going with about 5-6 more to put up this week!  We will be enjoying all the cultured veggies through the winter this year.

Of all the veggies my son could love cultured, he is a HUGE fan of radishes.  I'm trying to get some in bulk from my co-op, but until then, I picked up a few at the farmer's market this week to throw into my batch of dilly green beans.

Dilly Green Beans:

*1 5L pickl-it
*1 large bunch radishes
*3 large stems of dill
*4-5 pounds green beans
*2% salt brine (19grams fine pink salt to 4 cups of water)


Thoroughly wash the radishes and green beans.  Cut the radishes into halves or quarters depending on size.  Snap stem end off green beans.  Avoid using ones with blemishes.


Place the radishes on the bottom so they do not float to the top of the jar.  Pack in the green beans as tight as possible.  Fill to the shoulder of the jar.


Pack dill into the bottom the jar - I forgot to do this and it's easier to have this packed in the bottom where it will not be floating on the top above the brine.  Add enough of the 2% brine to fill 1/2 inch above the green beans.  Add glass dunkers to keep the beans under the brine.  Place on the pickl-it lid and put in a dark, cook spot for 3 days, then place in fridge.  In this hot summer weather, I am keeping my ferments in my pantry on our cool ceramic tile.


This is after about 24 hours.  See all the active bubbling!  This means the fermentation process is working.

You can see the bubbling at the top of the jar as well.  Enjoy these yummy beans over the next months. They should be stored in an air-tight Fido.  The great thing about pickl-its and Fidos are the lids are interchangeable, which means, once you are done fermenting you can pop off the pickl-it lid and place the Fido lid on the jar.  This helps to keep the integrity of the ferment.

(Featured on the Healthy Home Economist, Homestead Revival, Real Food Forager, The Nourishing Gourmet)

Sunday, August 12, 2012

Fermented Foods Link Love

This week I am going to post some links to recipes by some of my fellow Nourished Living Network bloggers.  These all look delicious and I can't wait to try them out!


In case you missed this recipe last week, here is my post about culturing watermelon rind, using my friend Melanie's recipe, from Pickle Me Too.   It is so yummy - my toddler is a big fan.


KerryAnn from Cooking Traditional Foods, discusses the importance of how to use salt in your ferments.  This is an extremely helpful post for all fermenters to read.

This recipe for Beet Kvass, is next on my list to try along with Water Kefir!  Lydia, a wonderful nutritional therapist, gives us her recipe for this healthy, probiotic rich drink on her website Divine Health from the Inside Out.  

I can't wait to get my fresh water kefir grains from Lydia (above!), so that I can use this recipe from Patty at Loving Our Guts for making water kefir.  This fermented drink is delicious and I am looking forward to getting my family drinking it every day!

Melanie at Pickle Me Too, has this delicious looking recipe for red onions.  I can't wait to try these as we are big onion lovers in our home.

The Hybrid Rasta Mama has a humorous, but informative post about safe practices when it comes to fermenting.  This is an excellent post to read whether you are a fermenting pro, just getting started, or just want to know what it's all about!

If you love carrots, you have to try this fermented garlic and dill carrot recipe.  This looks delicious and I am looking forward to trying this one out as a snack food for the family.


The wonderful thing is that these are all recipes using safe, anaerobic fermentation practices that will protect your ferments from molds and produce delicious tasting ferments every time!  If you have any questions about why I use the pickl-it for my ferments, feel free to leave a comment below.  You can also read THIS post I wrote a couple of weeks back about why I have switched over to using the pickl-it exclusively.

(Featured on The Healthy Home Economist)


Sunday, July 29, 2012

Cultured Mondays - Why I am Using a Pickl-it for Fermenting

Today, instead of posting another recipe, I wanted to discuss some of the changes to my fermenting practices with my readers, as I have had a number of questions recently.

I have been doing a lot of reading over the past few months, considering some research done by both KerryAnn Foster at Cooking Traditional Foods (read more about oxygen and bifidus HERE), and Kathleen, the maker of the pickl-it (read the steps of fermentation HERE).  I have come to the conclusion that fermenting in an anaerobic environment is a safer option and especially helpful for those who need to heal their gut (which would be most of us!).  Pickl-its provide an increase in the probiotic bacteria that are needed to heal the gut.


I did not want to deal with the possibility of molds growing in my ferments (which has happened in mason jars) or limp and soggy ferments (which has also happened in the mason jar).  I did not know what I was missing until I tried the pickl-it and have had ferment after ferment come out tasting delicious, crisp, and less salty.  It has been very eye opening comparing the two methods.  If you would like to read a similar experience by another Nourished Living Network Blogger, read this post by Lydia at Divine Health where she shares her reasons and experience switching from mason jars to Pickl-its.

I want to be clear to my readers that at this time, I am not an affiliate of pickl-it.  I simply appreciate the quality product that pickl-it is and want to encourage my readers to use a pickl-it (or a Harsch crock, which also provides an oxygen free ferment) so that you all can ferment safely and effectively.


I have also learned that whey is not needed with the pickl-it and can actually contribute to less of the healing forms of probiotic bacteria.  Here is an excellent post written by Melanie at PickleMeToo, discussing in further depth the reasons why whey is not needed or often helpful when fermenting and using a pickl-it.


I recently bought a number of Fido jars to use to store my ferments in once they are done fermenting.  Fidos provide an air-tight environment, which is excellent for store ferments.  These SHOULD NOT be used for the fermenting process (except yogurt) as they do not allow the air to escape (Pickl-its are made from Fido jars, but have airlocks, which keeps oxygen out, but allows carbon dioxide, which builds during the fermenting process, out).  I have found that you can get Fido jars on sale for excellent prices at both Crate and Barrel or Sur La Table (both are still having a sale last time I checked and the shipping at Crate and Barrel is just a flat $5 fee).  Amazon does carry them, but the prices are often not as good, so check those other stores first.

When you ferment, you are going to end up with a lot of extra brine.  Here are some creative ideas from Lisa, at Lisa's Counter Culture, about how you can use that extra brine.

There are a lot of traditional foodists who still use the mason jar and have chosen that method of fermenting, but I have come to realize that that is not the method I want to use or teach to others.  Thank you all for your patience as I have been making these changes over the past few months.

(Featured on Healthy Home Economist, Homestead Revival, Real Food Forager, The Nourishing Gourmet)


Sunday, July 22, 2012

Cultured Mondays - Super Easy Cultured Green Beans

I'm sure that many of you are enjoying an abundance of green beans this summer.  We love green beans in this house and I had a bunch from the co-op that I wanted to culture very quickly this past week.

I washed and removed the stems from my green beans.  I used the 1 1/2 liter size pickl-it jar and packed it with the green beans until it reached the shoulder (my guess is between 1-2 pounds of green beans).  I then placed the glass dunker on top to help keep the beans under the brine and poured a 2% salt brine over the beans (you can use this guide for figuring out salt brine).  And that was it!  I let them sit out for 3 days in my dark pantry where it is a bit cooler than the rest of the house (ideal fermenting temp is around 70 degrees).

These came out delicious and quite crispy.  These can be eaten right out of the jar, dipped in hummus, or chopped up in a salad for just a few ideas.  I have a feeling they won't last long in our house!

(Featured on Healthy Home Economist)

Wednesday, July 18, 2012

The Switch: From Mason Jar to Pickl-it

As many of your know, I have recently made the switch from using mason jars (a method often used by Nourishing Traditions and Sandor Katz) to using a Pickl-it Jar for my culturing and ferments.  I could not be happier with the switch and having been producing some beautiful ferments with less salt and no starter culture or whey.

I made this switch because of new research done by KerryAnn at Cooking Traditional Foods.  I have also appreciated all the information at the Pickl-it Website, which helped me make this decision.

Bottom line - from all the reading I have done, I believe that safer, tastier, and healthier (increased amounts of important probiotics called LABS) ferments are done in an anaerobic environment, which the pickl-it produces and a mason jar cannot.

I really enjoyed reading this article by Kathleen over at Pickl-it today: Open Crocks are a Crock!

If you would like a fun, easy recipe to try with some summer squash, check out my Yellow Squash Pickles...I opened these today and they won't last long.  My toddler is gobbling them down!!


Sunday, July 15, 2012

Cultured Mondays - Yellow Squash Pickles

It's Cultured Mondays again!  I thought I would give you just a little peek into my life...We returned from a lovely vacation at Lake Tahoe.  It was so peaceful and relaxing and I can't wait to go back again!


This week I decided to try to ferment some yellow squash we received this week in our co-op.  I have really enjoyed using my new pickl-it jars and highly encourage the use of these jars for fermenting, as they provide an anaerobic environment that will produce a safe fermented product (I do not get compensated for encouraging the use of pickl-it jars.  I am just a very satisfied customer.)


For this recipe I used:

*3 mediums sized yellow squashes
*14 small garlic cloves, lightly crushed by hand
*1 handful of fresh dill
*2.5% brine (15 grams of fine pink salt to 3 cups of water)
*1 1/2 liter pickl-it jar

Wash the squash, garlic cloves, and fresh dill.  Slice the squash into pickle like slices.  Place squash, garlic, and dill into jar.  Pour over brine and fill until it hits the jar's shoulder.  Allow to sit in a dark place (like a kitchen cabinet)  for about three days or until bubbling slows.  Ferments do best at about 70 degrees, so since we are in the summer heat, try to find a cool spot in your home and check your ferment frequently
My jar is just slightly overfilled

Ready to brew!

(Featured on the Healthy Home Economist, Homestead Revival, Real Food Forager, GNOWFLGINS, A Little Nosh, Beyond the Peel, Nourishing Gourmet, Food Renegade)

Wednesday, February 8, 2012

Kraut Pounder


My new favorite tool!  This is perfect for making your fermented foods.  I recently bought this lovely tool and wish I had done so years ago.  You can find this on Cultures for Health.  Just click the link to the right and try one out yourself!

If you are interested in learning more about the subject of whole foods and how to do it on a budget, be sure to check out my sister's blog for excellent ideas and resources!  Click HERE!

Sunday, February 5, 2012

Salted, Cultured Lemons

It's Cultured Mondays again!  How is your culturing challenge going?  We continue to enjoy our cultured foods daily and my family is having fun with each new addition I make each week.  This week I made salted, cultured lemons.

If these lemons come out tasting as good as they look, I will be thrilled!  I used the recipe in Nourishing Traditions to make my salted lemons and I can't wait to taste them.  They have been out for almost a week and are looking wonderful.


Recipe from Nourishing Traditions:


*5 organic lemons, preferably thin-skinned variety 
*3 T sea salt
*3 cinnamon sticks, broken up
*2 T whey
*juice of two lemons


Wash lemons well, slice thinly and cut slices into quarters.  Toss in a bowl with salt and cinnamon sticks.  Place in a quart-sized, wide mouth mason jar and press down lightly with wooden pounder or a meat hammer.  Mix lemon juice with whey and add to jar, pressing down so that the liquid completely cover the lemons.  Lemons should be a least 1 inch below the top of the jar. Cover tightly and keep at room temp for up to 2 weeks, turning the jar once a day, before transferring to cold storage.  When adding to recipes, remove pulp and cut skin into a julienne.


(I used Meyer lemons, did not break up my cinnamon sticks, and added about 20 cardamon pods.  My lemons have been sitting out for a week and I have no mold issues.  I plan to let these sit out one more week, then I will refrigerate. )

These lemons can be used minced in a variety of ways (and I will be searching the internet to find even more uses!).  I plan to mince them and place them in salads, over cooked meat or fish, in fruit salads, and in tuna fish.  Enjoy and if you have any recipe ideas, please leave a comment.

(Featured on The Healthy Home Economist, Nourishing Treasures, DIY Home Sweet Home , The Gunny Sack, Home Savvy A to Z, Frugal Antics of a Harried Homemaker, Delightfully Dowling, My Sweet and Savory, Make Ahead Meals for Busy Moms, You Are Talking Too Much, Raising Isabella, So Very Creative, New Life on a Homestead, Ruth's Real Foods, A Southern Fairytale, Sumo's Sweet Stuff, Homestead Revival, Organizing Junkie, 11th Heaven's Homemaking Haven, Real Food Forager, Simply Sugar and Gluten Free, Whole New Mom, Kelly the Kitchen Kop, Mind, Body, and Sole, GNOWFGLINS, Nourishing Traditions, Real Food Freaks, Real Food Whole Health, Food Renegade, Jo's Health Corner)

Sunday, January 15, 2012

Cultured Foods Monday: Cultured Ginger Root


Be sure to stop by our giveaway post starting 1/17 as my sister Christy over at Whole Foods On a Budget and I will be doing a fun giveaway!


It's been so fun seeing how many others in the blog world are all about cultured foods this year!  I have already found so many fun ideas to try.  As I posted last Monday, I will be doing a post every Monday this year with a new cultured foods recipe or with some great cultured food facts.  Today I am posting my cultured ginger root recipe that I adapted from Nourishing Traditions.  Nourishing Traditions calls for 3 pounds of ginger root.  In my opinion, this is way too much to do at one time.  Peeling and slicing up one pound was quite enough for me and this cultured ginger is potent, so a little goes a long way.  Here is my adapted recipe:

*1 pound ginger root, peeled and sliced very thinly
*2 T whey
*1 T pink salt
*1/2-1 cup water

Rinse the peeled and sliced root and place in 3 cup sized jar.  Pound lightly to release juices.  Mix water with the salt and whey and add to ginger.  Make sure that the root is completely covered and that there is at least one inch of space below the top of the jar.  Cover tightly and allow to sit in a dark place at room temperature for 3 days, then transfer to the refrigerator.

Cultured ginger root can be used in a number of recipes.  Try it minced finely in salad dressings, stir fries, yogurt and fruit, fruit crisps, hot tea, steamed rice and more!  If you are adding it to a cooked item, add it after the item has finished cooking to keep the probiotic properties intact.  I added it to salad dressing and it was so yummy!  And, remember, a little bit goes a LONG way!  So make sure you mince it finely and use a small amount.

Be sure to stop by our giveaway post starting 1/17 as my sister Christy over at Whole Foods On a Budget and I will be doing a fun giveaway!

(Featured on Nourishing Treasures, Home Savvy A to Z, My Sweet and Savory, Make Ahead Meals for Busy Moms, Delightfully Dowling, You are Talking Too Much, The Healthy Home Economist, DIY Home Sweet Home, So Very Creative, Marvelously Messy, The Gunny Sack, New Life on a Homestead , Ruth's Real Food , Sumo's Sweet Stuff, Mom's Crazy Cooking , Homestead Revival, Frugal Antics of a Harried Homemaker , 11th Heaven's Homemaking Haven, Organized Junkie, Marvelously Messy, Far Above Rubies, Hope Studious, From Mess Hall to Bistro , Permanent Posies, All the Small Stuff, Nap Time Creations, Real Food Forager, Time Warp Wife, Simply Sugar and Gluten Free, Mandy's Recipe Box, Rook #17, The 21st Century Housewife, Food Corner, Savvy Southern Style, The King's Court IV , Beyond the Peel, We are that Family, Raising Homemakers, Mind Body and Sole, This Chick Cooks, Kelly the Kitchen Kop, Momnivore's Delimma, Somewhat Simple, Miz Helen's Country Cottage, Tales From Bloggeritaville, A Little Nosh , Premeditated Leftovers, Frugal Follies, Delightful Order,  It's a Keeper , The Nourishing Gourmet, Happy Hour Projects , Comfy in the Kitchen, Real Food Whole Health, Real Food Freaks , Food Renegade, Simply Sweet Home, Happy Hour Projects, Bacon Time with the Hungry Hypo , Common Sense Homesteading, Allergy Free Vintage Cooking, Fitness Friday, Whipperberry, Butter Believer, A Well Seasoned Life, Six Sister's Stuff

Sunday, January 8, 2012

Cultured Food Challenge 2012

I have been wanting to challenge myself to a "one cultured food a day"challenge for quite some time!  So, I am starting the Cultured Food Challenge 2012.  Join me in the goal of eating one cultured food a day.  Each Monday for the rest of the year, I will be posting recipes, ideas, and information about cultured foods.

If you are new to culturing and that goal seems daunting, then set a goal that will helpful for you!  It has certainly taken me a few years of making cultured products to reach this goal.  The object is to eat more cultured foods and benefit from their healthful properties.

Here are a few cultured food ideas to get you started: yogurt, kefir (both dairy and water), cultured sour cream, cultured butter, kombucha, sauerkraut, cultured carrots and beets, cultured applesauce, cultured condiments like mustard, ketchup, and jam.  There are many more, but hopefully those will give you some ideas to get started.

Cultures can be purchased at Cultures for Health.  Just click on the Cultures for Health icon to the right and it will take you straight to their website.  They have a vast variety of cultures and all come with detailed descriptions on how to use them and the company is very helpful for answering any questions you might have.

Questions can also be left in the comments section of this website and I will answer as many as I am able.

Here is a recipe I made this week that created my most beautiful cultured product to date!

Garlicky Green and Purple Sauerkraut:

*one large head of green cabbage
*one large head of purple cabbage
*6 large garlic cloves, sliced in half
*2 T dried seaweed flakes
*16 pepper corns
*4 T sea or pink salt

Shred cabbage in food processor and back into two 6 cup canning jars.  Pound until juices start to form and come even with the top of the cabbage.  Add 2 T salt, 3 garlic cloves, 1 T dried seaweed, and 8 peppercorns to eat jar.  If you do not have seaweed, then add an extra T of salt.  Cover and store in a dark place for 3 days, then place in the fridge.

This is my favorite sauerkraut creation to date!  The color is stunning and the garlic and peppercorns add a spicy kick.  My husband loved it.

(Featured on My Sweet and Savory, Make Ahead Meals for Busy Moms, You are Talking Too Much, The Healthy Home Economist, Delightfully Dowling, 11th Heavens Homemaking Haven, Frugal Antics of a Harried Homemaker, Homestead Revival,  Organizing Junkie , A Southern Fairy Tale , Market Yourself Monday, Home Savvy A to Z , Nourishing Treasures,   Real Food Foragerhttp://realfoodforager.com/probiotic-food-challenge-linky/ )

Sunday, January 1, 2012

Fermenting Part 4 - Fermented Applesauce

My sister has a lovely recipe for fermented applesauce on her blog Whole Foods on a Budget that you can read HERE.  She has both a cooked and a raw fermented version.  Today I made the raw version and it is quick and easy!  To help the fermenting process along you will need whey, which you can get from store bought yogurt or you can purchase a yogurt culture and obtain your whey from homemade yogurt.  Cultures can be bought from Cultures for Health.  Just click on the link to the right.  They have a number of wonderful yogurts you can make at home, many of them heirlooms.  I have tried two of their yogurt cultures so far and love them!!

 I was able to use some golden russetted heirloom apples that I purchased from our local co-op.  I love the look of these apples.  They are a variety that used to be used for making cider.  I used my vitamix to quickly grind up my apples.  I found I did not have add any water to get them to applesauce consistency.
Here is my applesauce, ready to ferment!  I'm taking advantage of this warm spell we are having in SoCal and putting up a bunch of fermented foods.  Yum!

(Featured on My Sweet and Savory, Make Ahead Meals for Busy Moms, You are Talking Too Much, The Healthy Home Economist, Frugal Antics of a Harried Homemaker, 11th Heavens Homemaking Haven, Delightfully Dowling, Hartkei is online, Homestead Revival, Marvelously Messy, Hope Studios , From Mess Hall to Bistro, Permanent Posies, Nap Time Creations , Real Food Forager, Learning the Frugal Life, Time-Warp Wife  , Rook # 17, Crazy for CrustThe 21st Century Housewife, Simply Sugar and Gluten Free, Far Above Rubies, Frugally Sustainable , Food Corner, Savvy Southern Style, The King's Court IV , This Chick Cooks , We are That Family , Mind, Body, and Sole, Kelly the Kitchen Kop, Miz. Helen's Country Cottage, Beyond the Peel, Frugal Follies, Delightful Order, Somewhat Simple, GNOWFGLINS, Tales from Bloggeritasville, A Little Nosh , It's a Keeper, The Nourishing Gourmet, A Glimpse Inside, Feeding Four, Bizzy Bakes , Simply Sweet Home, Happy Hour Projects, Finger Prints on the Fridge, Fitness Friday, Comfy in the Kitchen, Fresh Bites Friday , Real Food Freaks, Bacon Time with the Hungry Hypo , Jane Deere, Jo's Health Care Corner, Allergy Free Vintage Cookery, Whipperberry, Friday Food Flicks , Real Food Forager)

Wednesday, December 21, 2011

Fermenting Part 3

 This post we will discuss making homemade yogurt.  It's a simple process and a great way to have unique fermented cultures, as each different kind of yogurt you make at home will have different healthy bacteria.  I am currently using Bulgarian Yogurt, the cultured being purchased from Cultures for Health. You can click on my link on the right side bar to explore all the various yogurt cultures they sell.  The nice thing about this culture is that it is an heirloom variety and perpetuates from one batch to the next, making it very economical.  I have been using this one for almost 2 years.

The first step is heating your milk to 170 degrees.  I like making big batches, so I heat enough milk to fill a six cup canning jar.
 I like to use organic non-homogenized milk, as I avoid homogenized products due to their health risks (you can read more HERE).  Once the milk has been heated to 170 degrees, I then let it cool to about 100 degrees and add about 1 tsp (or a little more) of my previous yogurt for each cup of milk I use.  You have to wait until your milk cools before you add the yogurt or you will kill the ability of the yogurt to set.
 I then transfer my covered jar to my Excalibur Food Dehydrator, as it is large enough to hold my canning jar and I set it to 105 degrees for 4-5 hours.  If you do purchase a dehydrator, I recommend buying the one with a timer.  Side note: not only is this dehydrator great for making dried foods, but it makes yogurt making a breeze and is great for bread rising or keeping sourdough cultures going in this cool weather.
Here is my milk getting ready to go into the dehydrator.  Homemade yogurt will not be as thick as store bought (though you can thicken it by substituting cream for some of the milk), but it is delicious!  I often eat it plain, with a bit of fruit, or with maple syrup or one of my herbal simple syrups that I posted about earlier this month.

Homemade yogurt is delicious, easy to make, and full of unique cultures that will boost your immunity!  Have fun trying this recipe and be sure to check out all the yummy yogurt cultures at Cultures for Health.

Featured on Simply Sugar and Gluten Free

Sunday, December 18, 2011

Fermenting Part 2

 For this post, I thought I would share a very easy recipe for sauerkraut, which is an excellent fermented food, once called the poor man's doctor.  For this recipe, you don't need any kind of starter.  Some people do add whey, but because my son is sensitive to whey, I make mine using only salt.

Sauerkraut:

*2 large, heavy heads of organic cabbage
*5 T sea or pink salt (it has to be non-iodized and sea or pink salt work best)
*1 T nori seaweed flakes (optional)
*2 six cup canning jars

Wash off the cabbage.  On a clean surface (you want to keep everything as clean as possible, avoiding touching other things during this process to keep as little as possible other bacteria entering your fermenting jars), roughly chop your cabbage, then place it in a shredder or cuisinart using your shredder blade.  Evenly fill your two jars with the shredded cabbage.  Add 2 1/2 T salt to each jar, or if you are using seaweed, only add 2 T salt to each jar.  Next take a meat pounder or similar kitchen tool and pound the cabbage down until you see juices starting to form.  Once the juices reach the top of the cabbage, you can stop pounding.  You will be surprised how compact it gets!  Make sure the salt and seaweed are well blended.  Cover the jars loosely and  place the jars in a dark cabinent in your kitchen for 3 days.  In this cooler weather, you make have to leave it out a 4th day.  The finished product may fizz a little and should expand in your jar.  It will have a sharp tang, but discard if you taste anything that tastes bad or smells foul.  Enjoy!

For those interested in the added nutritional benefits of seaweed, I highly recommend Seaweed, by Valerie Cooksley.  She discusses all the amazing health benefits of seaweed.  I understand the book is no longer being printed, but you can buy it on amazon.  Just click on my amazon link to the right.  I love this book because of all it's information and she also tells you how much to take, which is quite helpful.

Mountain Rose Herbs carries a number of kinds of seaweed and they are all from Canada or Iceland, which I recommend as you do not want to be buying seaweed from Japan or China since Japan's nuclear accident.  Some of my favorites are nori and dulse flakes and sea lettuce.  You can click on my Mountain Rose Herb link to the right to see more varieties of seaweed.

(Shared at Real Food Wednesdays, The Nourishing Gourmet, A Glimpse Inside , Ani's Favorite Things, A Little Nosh, Gnowfgins , Ms. Helen's Country Cottage, Momnivores Delimma, Somewhat Simple, Delightful Order, Food Renegade, Real Food Whole Health, Jo's Health Corner,  Bacon time with the hunger hypo, Diet Dessert Dogs, KB and White Snake Home

Friday, December 16, 2011

Fermented Foods...Why Ferment?

I am going to do a series of posts over the next few days about the benefits of fermented foods and share some easy ways that you incorporate these beneficial foods into your life and diet.

Why ferment?

What did people do before the modern resources we have today to preserve our foods?  Most cultures preserved their foods through the fermentation process, which not only preserved their foods, but also provided them with the amazing benefits that I have listed below.  Sadly, our modern culture, for the most part,  consumes very few fermented foods, and is suffering from the lack of these beneficial foods in their diet.

Here is a brief summary on the benefits of fermenting along with some great resources for further reading:

*increases the levels of B vitamins in your foods
*aides digestion
*boosts the immune system
*increases omega-3 fatty acids
*increases digestive enzymes
*alters vegetable proteins to resemble meat proteins
*increases the nutritional value of the food by synthesizing vitamins and amino acids
*helps the growth of healthy bacteria in the colon

For further reading:
*Article by Dr. Mercola
*Enroll in Vintage Remedies Holistic Wellness Course - to read more about this, click the link on my website for Vintage Remedies
*Article by Robert Lawrence
*Article by the Herb Companion


I will next be discussing how to make fermented foods.  If this is something that you are interested in, click on the link to the right for Cultures for Health and take a few minutes to start looking around their website and find some fermented foods that appeal to you that you would be interested in trying.  Almost all fermented foods are easy to make and will easily become part of your daily routine.

Thursday, December 15, 2011

Fun Recipe!

I am going to try this recipe from Cultures for Health for a delicious dip for my family this Christmas Eve.  The recipe is a sun-dried tomato, basil, hazelnut, kefir dip.  I can't wait to use the sundried tomatoes that I made this summer in this dip.
Since I have not been making kefir, I will simply substitute some of my homemade yogurt.  I will be doing a series of posts shortly on the importance of incorporating fermented foods into your diet.  If you are looking to improve or maintain your health, eating fermented foods is key!
I buy all my starters from Cultures for Health.  I have used their kefir, two kinds of yogurts, sourdough bread, and water kefir starters with great success.  I am getting ready to start up their buttermilk culture as well! Take a few minutes to read through their website.  You can do so by clicking on the link to the right.
If you are looking for an easy culture to start with, try their buttermilk.  It is very easy and quick to make.